Welcome to the wonderful world of DIY paper crafts for kids! This exciting realm of creativity is not just about cutting and pasting; it’s about igniting the spark of imagination in young minds. Engaging children in these crafty activities provides a fun and interactive alternative to screen time and is critical to their developmental growth. Plus, who doesn’t love a homemade masterpiece that can be proudly displayed for all to see?
It enhances their fine motor skills and encourages problem-solving abilities. Moreover, it paves the way for kids to express their creativity, fostering confidence and self-esteem. This blog post lists 25 DIY paper craft ideas your kids will love. Dive in from origami and paper plate masks to shadow puppets and DIY kites!
25 DIY Paper Craft Ideas for Kids
There are endless possibilities when it comes to paper crafts for kids. Explore some of the most popular and easy-to-do ideas that your little ones will surely enjoy, such as:
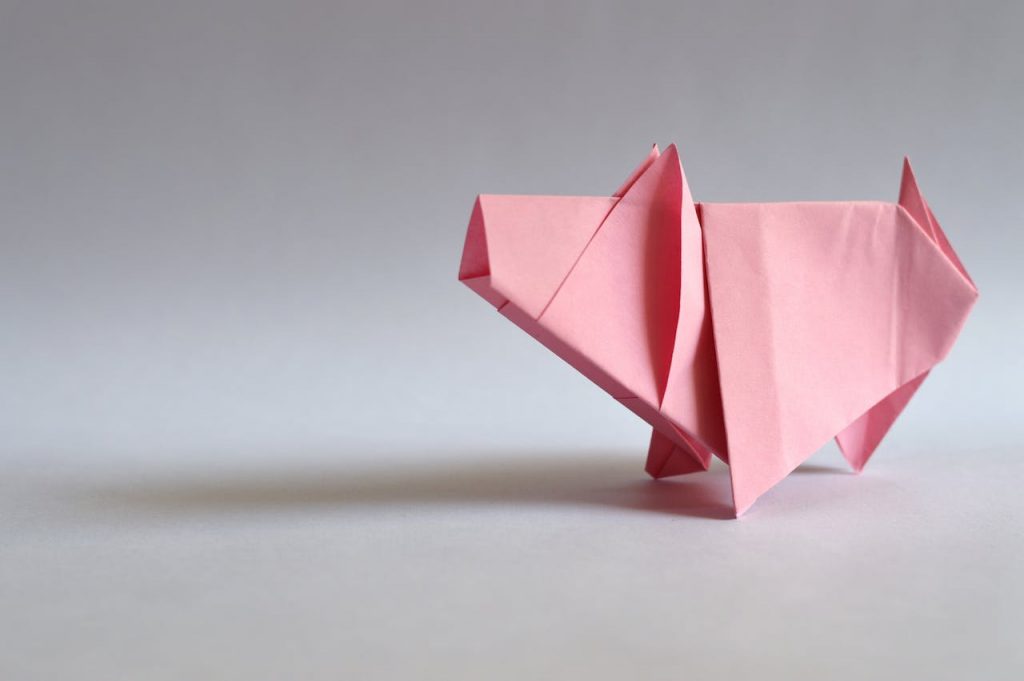
Origami Animals
Origami is a beautiful art of paper folding that can be traced back to Japanese culture. It requires precision, patience, and creativity. Here are the quick steps to create a simple origami animal like a bird:
- Start with a square piece of paper, colored side down.
- Fold the paper diagonally to create a triangle.
- Fold the triangle in half to make a smaller triangle.
- Open the smaller triangle, revealing a crease in the middle. Fold the right and left corners along the crease line to the bottom corner.
- Fold the bottom corner to meet the top corner.
- Flip the paper over, and voila! You have a simple origami bird!
This is a basic origami animal shape, and by experimenting with the size and location of the folds, children can create different animals like frogs or fish. Remember, practice makes perfect in origami, so don’t worry if the first few tries aren’t excellent.
Paper Plate Masks
Paper plate masks are a fun and easy crafting activity. Kids can let their imagination run wild, transforming plain paper plates into masks of their favorite animals, cartoon characters, and superheroes. Here’s how to make an essential paper plate mask:
- Take a paper plate and cut eye holes.
- Use a hole punch to attach an elastic string on either side.
- Decorate the mask with markers, crayons, colored pencils, or paint. Kids can draw animal faces, characters, or people.
To boost creativity, try using additional craft materials. Glue-colored feathers for a tropical bird mask, or add cotton balls for a fuzzy bunny mask. Colored tinsel makes great mermaid hair, while colored paper can be used as dragon scales. The possibilities are endless with paper plate masks! Just make sure to let the mask dry completely before wearing it.
Paper Bag Puppets
Creating paper bag puppets is a delightful craft that combines creativity with role-play. Here’s a simple way to make them:
- Flip a paper bag upside-down so the rectangular bottom is at the top.
- The rectangular part will become the puppet’s face. Draw eyes, a nose, and a mouth on it.
- Use colored paper to add more features like ears, hair, or a hat, and glue them on.
To create characters, design puppets based on storybook characters animals, or make up your own! Give them a name and personality. It’s showtime once your puppet is ready! Encourage your child to bring the puppet to life through storytelling. This boosts their narrative skills and stretches their imagination.
Accordion Fold Butterflies
Creating accordion fold butterflies is a cheerful activity that introduces children to symmetry and simple folding techniques. Follow these steps to make your butterfly:
- Start with a rectangular colored paper and fold it in accordion style (back-and-forth folding).
- Pinch the center of the folded paper to form the butterfly’s body, securing it with a twist tie or string.
- Spread out the folds to shape the wings.
To bring the butterfly to life, add details. Draw or glue eyes to the body and attach pipe cleaners as antennae. For the wings, please encourage your child to create patterns using markers or stickers, either mimicking natural butterfly patterns or letting their imagination flutter and create their own. Creating these beauties is fun and enhances the child’s understanding of patterns, symmetry, and nature.
Tissue Paper Flowers
Tissue paper flowers are impressive decorations for any occasion. They are simple to create and provide an excellent opportunity for children to experiment with different shapes and assembly techniques. Here’s a step-by-step guide:
- Choose colored tissue paper sheets and stack them.
- Fold the stack accordion-style, with each fold about 1 inch wide.
- Fold the accordion half and secure the middle with string or a twist tie.
- Slowly separate each layer of tissue paper, pulling away from the center.
- Repeat with different colors and sizes to create a bouquet of tissue paper flowers.
Experiment with different flower shapes by cutting the ends of each tissue paper stack. For example, round the end for a peony-style flower or point the end for a dahlia-style bloom.
Paper Roll Animals
Create eco-friendly paper roll animals by upcycling used rolls into fun play items. The possibilities are endless, from slithering snakes to roaring lions or towering elephants! Here’s a simple way to make a paper roll snake:
- Paint a paper roll in your chosen color.
- Once dry, cut the roll into a spiral to create a coiled snake shape.
- Add googly eyes and paint colorful patterns or scales for detail.
For other animals, cut out shapes for ears, manes, or trunks from colored paper and attach them to the roll. Use markers to add eyes, noses, or mouths. Let your kids’ imagination shine while decorating their paper roll animals. This activity repurposes waste and enhances their understanding of animals.
Crayon Art
Creating art with melted crayons is a vibrant and fun way to explore the merger of colors and textures. This unique technique opens a world of creative possibilities. Here are a couple of innovative ideas:
- Crayon Drip Art: Attach crayons along the top edge of a canvas or a sturdy piece of paper. Use a hairdryer to melt the crayons, which will drip down, creating a spectacular waterfall of colors.
- Melted Crayon Abstract Art: Grate crayons over a piece of paper. Place another sheet on top and iron it lightly. The crayons underneath will melt, creating a beautiful abstract pattern.
Safety is paramount when creating crayon art. Here are a few safety tips:
- Monitor closely: Always supervise children during this activity, especially when using a hairdryer or an iron.
- Use safety gear: Protective gloves are recommended to prevent burns.
- Choose a safe place: Use a heat-resistant surface to place your paper while melting crayons.
Paper Collage Art
Creating paper collage art provides an excellent platform for kids to explore shapes, colors, and textures. Children can arrange and overlap cut-out paper shapes to create abstract designs or representative images. Here’s a simple method to make a paper collage:
- Gather colored paper, magazines, or old book pages.
- Cut out different shapes from these papers. They can be geometric (circles, squares, triangles) or organic (leaves, stars, hearts).
- Arrange and glue these shapes onto a larger piece of paper. Layering the cut-outs adds depth and interest.
Collage art is versatile, allowing children to experiment with color combinations and patterns. Discussing color theory, pattern recognition, and composition is a fantastic opportunity. Plus, it’s a great way to recycle old magazines and paper scraps.
Paper Mache Projects
Paper mache is an ancient technique using paper and glue to create sturdy sculptural objects. It offers endless creative possibilities, from masks to small sculptures. The process involves soaking paper strips in a water and glue mixture, then layering them over a form. Once dry, it forms a hard surface that can be painted and decorated. Patience is key – allow each layer to dry thoroughly before adding the next. Try making a mask or mini-animal sculpture!
Quilled Creations
Quilling, also known as paper filigree, is a fascinating art form using rolled, shaped, and glued paper strips to create intricate designs. It’s an excellent way for kids to develop fine motor skills and explore creativity. You’ll need a tool, quilling paper strips, and glue to start. Curl and shape the paper strips to create shapes like loops, teardrops, or hearts. Glue these shapes together for beautiful designs.
Quilled creations can range from simple to complex, letting children progress at their own pace. For example, a quilled animal can start with basic shapes like circles for the body, teardrops for the heads and limbs, and tiny triangles for the ears. Quilled flowers can be made by rolling tight curls for the center and loose coils for the petals. Kids can create unique patterns with free-form designs, rolling and shaping the paper.
Handprint Animals
Handprint animals are a delightful and personal way to craft creatures. Simply paint your child’s hand and press it onto paper to create the animal’s body. Fingers turn into legs, tails, or trunks, depending on the animal you’re crafting. Add details like eyes, ears, or whiskers using fingerprints or thumbprints.
Pop-Up Cards
Pop-up cards add a 3D touch to greeting cards, making them enjoyable to create and receive. Here’s a simplified way to make one:
- Start with two pieces of cardstock paper: one for the card’s outer layer and another for the inside pop-up element.
- Fold both pieces in half.
- On the second piece, cut two parallel slits along the fold line for the pop-up mechanism. The size of these slits determines the pop-up element’s dimensions.
- Open the cut piece, push the area between the cuts (the pop-up mechanism) outward, then close the paper.
- Attach the second piece to the inside of the first using glue or tape, ensuring the folds align.
- Finally, open the card and decorate the popped-up element.
For different occasions, consider creating a pop-up heart for Valentine’s Day, a Christmas tree for the holidays, or a birthday cake. You can decorate the pop-up element with markers, stickers, or glitter.
Paper Weaving
Paper weaving is a simple and engaging craft for children to create unique patterns and textures. Interlace two paper strips (the warp and the weft) at right angles. Start with two colored paper sheets. Cut one into strips, leaving one edge intact to hold them together. Cut the second paper into separate strips, then weave them through the cuts of the first paper. Experiment with colors, strip widths, and weaving patterns for diverse results.
Sun Catchers
Creating sun catchers is a joyous project that fills your room with colored light. Here’s a quick guide:
- Cut out a shape from a piece of clear contact paper.
- Stick pieces of colored tissue paper onto the contact paper.
- Hang the sun catcher on a window to let the sunlight filter through, casting beautiful colors around the room. Experiment with different shapes and tissue paper colors for a stunning display.
Collapsible Paper Cups
Making collapsible paper cups provides a fun and practical craft for kids. Here’s a quick guide:
- Begin with a square piece of paper.
- Fold it diagonally and then unfold it.
- Fold two opposite corners to the center, creating a triangle.
- Fold the bottom corner up to where the previous folds meet.
- Turn the paper over and fold the remaining corner up.
- Lastly, open up the cup by pulling apart the sides.
To personalize the cups, kids can decorate the paper with markers, stickers, or rubber stamps before folding it. They can also use patterned paper for a unique look. These cups can serve various uses, from holding small toys to serving as a portable water dish for pets.
DIY Paper Beads
Creating DIY paper beads offers a fun, eco-friendly way to make unique jewelry or decorative items. To make the beads:
- Start with long, triangular strips of colored or patterned paper.
- Roll the piece tightly from the wide end towards the narrow end using a toothpick or skewer.
- Secure the future with glue, remove the toothpick, and let the bead dry.
- String together your beads to create beautiful bracelets, necklaces, or decorative garlands.
Paper Circuits
Paper circuits offer an innovative way to learn about electricity and circuitry. They are simple circuits on paper using copper tape, an LED light, and a battery. Start by drawing the desired path and laying the copper tape along it. Attach the LED light and battery, ensuring correct alignment. When the circuit is connected, the LED will light up! Remember to follow safety guidelines, supervise children, avoid touching the lit LED with bare hands, and turn off the circuit when not in use.
Marbled Paper Art
Creating marbled paper art is a mesmerizing process that produces unique, swirling patterns. Start by filling a shallow container with a thickening agent like cornstarch mixed with water. Add drops of colored acrylic paint and gently stir to create swirling patterns. Lay a piece of paper on the surface, ensuring contact with the mixture. Lift it off, let the excess drip off, and then let it dry.
Marbled paper can make cards, tags, or standalone artwork. Frame it or use it as a background for a quote or message. This technique offers endless customization options to match any color scheme or style.
Story Cubes
Story cubes are a fun, interactive way to spark children’s creativity and imagination. These are simple paper cubes, each side adorned with a unique illustration. Here’s a quick guide:
- Start with six square pieces of paper. Draw different pictures on each square.
- Fold these squares into cubes and secure them with glue.
- Roll the cubes to generate a random combination of images.
- Let the images guide your storytelling! Every roll brings a new tale, making this a versatile and endlessly entertaining activity.
Paper Bag Books
Paper bag books provide a creative platform for kids to write and illustrate their stories. Here’s a simple way to create one:
- Start with three or more paper bags.
- Stack them together, alternating the open ends of the bags.
- Fold the stack in half.
- Staple along the fold to bind the book.
- Now, your paper bag book is ready!
Each page, including the bag flaps, can be used for writing and illustrating. The bag openings double as pockets for storing extra pictures, notes, or keepsakes. Encourage young authors and illustrators to unleash their imaginations, crafting unique narratives and vibrant drawings in paper bag books.
Paper Windmills
Paper windmills capture the magic of the wind and are a delight to create and play with. Here’s a quick guide:
- Start with a square piece of colored paper.
- Cut diagonally from each corner towards the center, but only cut some of the way through.
- Fold every other corner towards the center and secure it with a pin.
- Lastly, attach the windmill to a stick using the pin. Be cautious with the pointy end!
These colorful windmills can be displayed in outdoor pots or used in garden decoration. Running with a windmill in hand also offers a playful way for kids to observe and understand the power of the wind.
Shadow Puppets
Creating shadow puppets adds a dramatic spin to storytelling sessions. Start by drawing characters or animals on black paper, then cut them out. Attach each puppet to a stick with tape or glue. For the theater, drape a white sheet over a frame and illuminate it from behind using a lamp or flashlight. Now, your shadow puppet theater is ready for action. Let the stories unfold in the captivating world of shadows.
Paper Plate Frisbees
Creating a paper plate frisbee is a cinch and a fun way to spend the afternoon. Here’s a quick guide:
- Start with two paper plates.
- Decorate the bottom of the plates with markers, stickers, or paint.
- Glue the decorated sides together and let them dry.
Remember, these frisbees are lighter than usual, making them safer for indoor use. You can invent games, set up targets, or just see who can toss their frisbee the farthest.
Paper Straw Sculptures
Creating sculptures using paper straws can be an engaging and imaginative exercise for kids. Paper straws can be easily bent, cut, and connected to form various shapes and structures. Integrating other crafting materials like pipe cleaners, clay, or cardboard adds more stability to the sculptures. An idea could be building a geometric structure, an abstract sculpture, or miniature architecture models.
DIY Paper Kite
Create a DIY paper kite for creative outdoor play:
- Fold a piece of paper in half and make two diagonal cuts to form a diamond shape.
- Tape a string in a cross shape, leaving extra for the tail.
- Attach a longer line at the center for control.
- Decorate with markers, paint, or stickers.
- Add a tail using paper strips or ribbons for stability during flight.
Remember, fly your kite in open spaces away from trees and wires. Hold the control string, run against the wind, and watch it soar!
Bottom Line
Engaging children in DIY paper craft activities, like creating quilled animals and paper beads or building paper circuits and straw structures, provides endless entertainment and fosters creativity, fine motor skills, and a basic understanding of concepts like circuitry. These hands-on projects, from simple handprint animals and pop-up cards to more complex marbled paper art and DIY paper kites, let kids explore textures, techniques, and themes, learning through fun and play. These 25 DIY paper craft ideas offer a wide range of options for both educational and recreational activities that inspire children to build, create, and imagine.